The slides I'm currently using are hand-bent from malleable, slightly stiff wire, scavenged from cheap umbrellas. Local puppeteers collect these every spring when gusty weather in downtown Boston sends many bumbershoots into the trash cans, especially around historic Copley Sq. I haven't seen this type in stores recently, but there still seem to be a number of such black umbrellas out there, with no maker identified, which use round wire ribs. Rod puppeteers normally prefer the folded metal kind so we swap our finds. Shadow puppeteers like the wire ones as well, which is what I first used them for. Old black wire coat hangers can also be used, especially for bending practice.
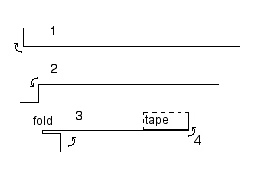
My bending pattern is achieved using two pairs of pliers, one needlenosed, one flat jawed electrician's style. (1) Bend one end of the straight wire at right angles about 3/4" in. (2) Bend that angle down about the same distance further in. Now the tricky part. (3) Fold the second end shut using the flat jawed pliers. (Slip-jawed pliers can be used but they're even trickier.) Pry this slot open so the sides are parallel and squeeze the fold so it lies flat. Lay the slide on a flat surface to check. A tap with a mallet between two pieces of wood may be needed. (4) Fold the other end at right angles in the opposite direction making sure this bend is in the same flat plain. (5) Create a handle by laying this end of the slide on a piece of cloth tape and folding it over so the tape sticks to itself. Use black or even colored tape (for coding). Trim neatly. Use a small label to the tape with the character identification, which can be covered or peeled off when the slide is reused.
To mount figures on this kind of slide, salvage some heavy aluminum foil from disposable bakeware. Cut a rectangle as long as the base of the figure and about 1 1/4" wide. Rough up one side with medium steel wool. Fold a right angle into it the long way with one side 1/2" and the other 3/4", roughened side out. Glue the 1/2" flap to the back of the figure and trim to match. UHU glue stick works well. Put cloth tape on both the bottom and the top of the 3/4" flap to add weight. Slide the figure into the fold in the slide. A bit of removable tape over the right-angle extending back will make keep things secure.
To store figures with these "feet" on them, stack them back to front with the flaps overlapping and clipped together. Lay them face down on tissue in a box. Sorting them by acts will make setup faster. Store the box so the figures are upright. They can also travel fastened to the slides in a large box with the flaps overlapping and the scenery stacked on top of the wires and tied down to prevent shifting. This sort of box has to store and travel flat.
This project began as a way to quickly create table top figures for use with a class of mentally challenged adults at a sheltered art center. There were a few small white plastic bowling pins lying around from an activities class. We first just drew faces and wrote names to have something to work with. However, these cheap toys tip over easily, and require a lot of imagination to acheive characterization. There were readily available at a local dollar store so we experimented.
First came arms. We joined two standard pipe cleaners and wrapped them around the neck of the pin, creating posable and somewhat manipulable appendages. A loop in each end indicated hands. These were soon covered by mitten shaped cut-outs. Cardboard cutout with bent elbows and "shoulders also rorked but were hard to activate.
The figures were now tippier, so a base aka feet was added, cut from posterboard. These extended further forward than behind, shaped like a trapezoid with rounded corners and a vee cut into the front. Low-temp hot glue secured them to the bottom of the pin.
The head of the pin, while easy to draw on didn't offer much room for facial features. We did add simple hats-such as bottle caps, small clown noses from using miniature pompoms, big moustaches, etc. Stryofoam balls were considered, but securing them would involve hollowing out a neck hole, messy and somewhat difficult. Paper masks were tried with some success, drawn on basic geometric shapes. A return to the dollar store offered one solution; cheap minature plastic fruit by the bagful A serrated kitchen knife and heavy shears made holes to the diameter of the neck. The head of the pin was then squashed enough to pop it in where it expanded. Blowing into the molding hole at the base of the pin after enlarging that opening with a pencil helped. The head will turn on the neck, but can be anchored by pushing a large "T" pin through the back of the head into the top of the bowling pin
There was now room for small google-eyes, bigger noses, larger hats, various mouths, earrings The tip of a hi-temp hot glue gun will melt holes in such cheap plastic. Plastic flowers and toys from the same source were disassembled and used to create rather fantastic characters. Use lo-temp hot glue sparingly and anchor such additions with straight pins during the glueing process.
There are larger plastic bowling pins available at chain toy stores. These usually come in bright colors rather than white, but can be painted if primed. Besides adding "feet" these need weigh inside to stay upright. Large plastic "easter eggs" can be used to give these bigger heads. Plastic bottles work too. There's definitely room for experiment.