Technote: Stands
Stand By Me
Late Nov. 2002
Supporting a puppet stage using stands rather than frames has become a popular alternative, especially with puppet teams. Folding stand can be expensive; homemade alternatives, such as buckets of cement or plaster get cumbersome. This is a grab-bag survey of alternatives.
Classic photographers' light stands, mostly made by Lowell, show up in yard sales, thrift stores, flea markets, etc. These come in three and four leg models, and generally extend to six feet. Steel wool and lubrication with white bike grease plus replacing missing adjusting bolts will generally make these useful. Small chem lab setup clamps are especially good for attaching crossbars, but U-Bolts and hoseclamps can be pressed into service. Those with tubing for the final stage will take a heavy wire hook in the top. Attaching gallon jugs of water to the bottom center makes them much more stable.
Any stand will benefit from being fastened to a floorplate, made from plywood, which enlarges its base and can take extra weights. Tieing the stand to a plate and taping the plate to the floor is often better than adding weight
Similar, but not as adjustable, are stands salvaged from portable movie screens, which can often be gotten for nothing. Dispose of old glass-beaded screens carefully. Sometimes the swivels for the screen case are riveted in place and must be drilled or sawed to remove them. Larger screens have square stock for the smallest extension, which can be carefully bent to a right angle for mounting purposes.
Various stands from the world of music can be adapted. The various units for drumsets can be gotten free or cheaply when the specialized mounts at the top give out. Folding music stands are flimsy but have their uses. The bottom parts of orchestra stands are often salvagable, the inner tube can be replaced with PVC. Even guitar floor stands can be modified to hold up light weight units. (See the design for "Ultralight"; www.puppetsbostonguild.org/pages/technote.html )
Then there are the plastic bases intended to be filled with sand or water to hold up beach umbrellas. These aren't especially convenient, but are easy to adapt for use with 1" PVC. They won't mark the floor and can easily be strapped to a circle of 3/4 ply which increases their stability.
Army surplus can still turn up useful stands. WWII vintage steel speaker stands are heavy but will hold light trees up to 10' high. There are Korean War era and after antenna supports made from fiberglass which have real possibility, if you can figure out how they go together. State surplus depots, which can sometimes be used by school programs are worth looking into.
Mike stands are of course another possibility. Their threaded bases not really intended to take much angular stress. The kind with four or five folding feet weigh less (and cost more) and are best used with an extra floor plates. But bases can be picked up second hand and there are cheap upright sections. Aluminum gas pipe will fit into most center tube, which will get about six foot of extension. Or PVC can be slide over the upper tube. So can smaller diameter aluminum tent pole.
Various floor lamps, particularly halogen lumieres, come in short sections with threaded connectors and have fairly heavy bases. These get thrown out regularly and are best used for free-standing banner or setpiece supports. Some smaller quartz lamps are also made from threaded sections and with the addition of plastic barbell weights make good stands for life-sized puppets.
Email:Will Stackman
posted by will 1:48 PM

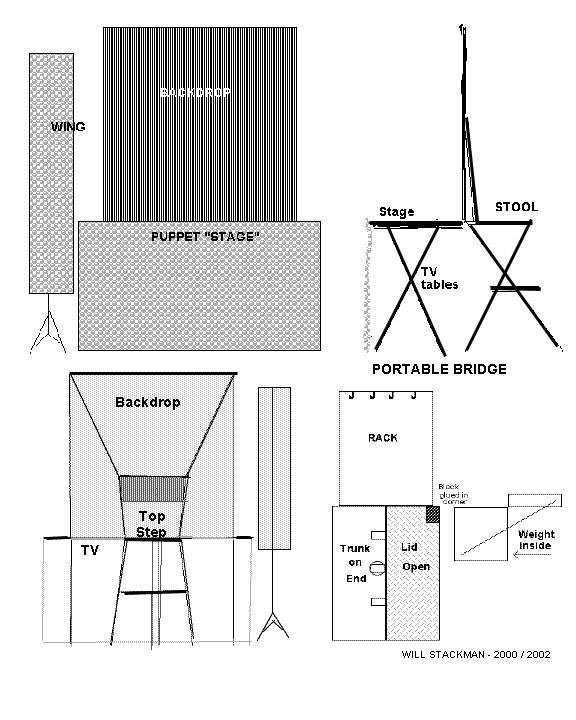
PortaBridge
Late Nov 2002
Even if there is a stage, in most multipurpose rooms the platform's too low to present string puppets without some sort of "bridge." This makes touring small scale marionette shows to such venues too cumbersome and uneconomic. This miniature setup will serve for a one person variety presentation or lecture-demo using string puppets strung to work at foot level.
1) Find a sturdy folding kitchen step stool, the kind actually intended to sit on--with a backrest . Steel is preferable, but a good grade aluminum one will work for lighter puppeteers. The top step should be about 2' off the floor and big enough to stand on comfortably. Heavy rug padding fastened securely will help. Fasten a toe stop at the front. If it's used, check all welds and pivots. Contemporary metal and fiberglass models will probably need a piece of plywood to stand on. Bolt this board in place, taking care that the stool will still fold.
2) A cheap footlocker--not the metal covered kind, approx. dimensions 16"x16"+x"32+"--will serve to carry everything needed for the show with the stool and stage table legs strapped on outside. Use a folding luggage hand-truck with big enough wheels to move this rig around. Reinforce the trunk by gluing muslin to the inside with white glue and painting over it with latex housepaint. Give the outside a coat of sturdy paint as well and don't forget to add a logo of some sort. And disable the &%# lock; use a padlock if necessary.
3) For the puppet "stage", get two flat-topped TV tables-- the kind with removable legs. Check the joints and clips regularly. A wrapping of black cloth tape will strengthen the tubing and the clips can be filleted with hot glue for support. Two tables end to end make a 15"x42" x25" or so playing area. Make a three fold top--plywood wall paneling is best--with cloth hinges. A light drape can be permanently attached to this floor. Secure it to the tables with four nylon clamps along the back edge. A piece of stiff wire bent in a "C" dropped over the inside pivots of the tables will keep them from moving apart. (See endnotes for an alternative "stage.")
4) The backdrop cloth is held up by a "goal post" assembled from three lengths of 1/2" aluminum gas pipe slightly shorter than the diagonal of the trunk--about three feet. The nicest way to fasten them together and to the stool is to use chem lab support clamps. (See endnote for alternatives.) The slant of the stool back has enough forward angle so knees and feet won't hit the cloth. The actual height of the backdrop depends on the height of the puppeteer and the puppets but should be at least above the operator's waistline. It should drop below the back of the stage and tie onto the table legs. Don't consider the top curtain bar a leaning rail.
5) Stand the empty trunk right behind the stool open at right angles, with the opening facing it. Mount a hanging rack for the puppets made from more 1/2 aluminum pipe. This can go through holes in one end of the trunk into wooden blocks glued and screwed on inside. Hang the puppets on this rack in performance order.
6) If possible, hang a lightweight dark backdrop behind the setup. See the Rolling Racks Technote (08/19/02) and the Stands Technote (12/01/2002) for support ideas. If possible, use clips or drapery hooks to fasten your backdrop to the back of the stage.
7) A small tape or CD player goes on the larger side of the trunk end and should be fastened down. A remote control that can be fastened onto one end of the hanging rack makes for a smoother show. Remote speakers placed under the stage are also nice. Small lights on stands or mounts to either side of the stage will improve focus on the puppets; real darkness is seldom an option. A single dimmer can be hung on one end of the backdrop bar if control is desired.
8) The backdrop is only a yard wide. The stage is a bit wider. To fill more stage, consider using folding music stands with a dowel extensions to hang 1'+ wings outboard of stage about six inches upstage. These need to be as tall as the puppets but not as high as the backdrop. They should go below the stage but don't have to reach the floor. Subdued decoration is possible. Spray the stands black.
9) The following packing order is a start.
a.Put the sound, lights, & a small toolbox at the end of the trunk which will rest on the handtruck. Put wingstands here too. Call this the "bottom end."
b.Tape a piece of bubble wrap to the bottom of the trunk. Lay out bagged performance clothes, then pack the puppets in their bags long ways. A string through the hanging loops anchored in the "top end"corners of the trunk bottom keeps them from sliding down. Cover with stage backdrop.
c. Lay the rack pipes diagonally across the trunk. Put the stage cover with skirt attached on top.
d. Lay the backdrop pipes on the opposite diagonal. Clamps needed for them should be in a bag at the bottom end. Place folded rear drop curtains at either end.
e. Put the table tops in last. Foam block glued to the lid should press on them--not too hard-- to keep things in place.
f. Strap the stool and the table legs to the top of the trunk and stand it on its bottom end. Bungee the trunk to the hand truck. If carrying in a backseat or trunk; handtruck may have to come off.
10) Packing was planned for this setup order.
a. Undo bungee and straps; fasten these to truck. Set it aside.Open stool; use to hang rear drop if needed. Place in position.
b. Set up tables; lay poles and clamps on them. Attach backdrop poles to stool. Then cover stage. Lay rack pipes under table. Hang backdrop; secure it.
c. Lay puppets on tables. Unpack sound, lights & wings to side. Hang up clothes. Stand empty trunk on bottom end behind stool, facing it open at a right angle. Store handtruck, puppetbags, toolbox, etc. inside.
d. Mount rack and hang puppets in performance order
e. Set player on wider part of top end of trunk. Fasten it down. Hang remote on end of rack . If using speakers place under stage and tape down wires. Test sound system.
f. Place front lights. Plug and test. Tape cords down.
g. Set up side wings on music stands. Use 2 liter plastic bottles full of water to stabilize if necessary.
A scratch illustration of this bridge can be found at
http://www.geocities.com/profwlll/PunchPix.html
ENDNOTES:
A more elaborate description and plans will appear in "New Stages for Puppetry"--someday.
*A puppet "stage" can be supported by running two short poles forward from under the top step, passing through conduit clamps screwed onto the underside. Hinged legs with locking brackets could be added to either end as well as extension flaps for a wide enough stage.
*The upright pipes could also socket into short sections with the right inside diameter which were U-Bolted to the stool back. The top pipe can rest on U-Bolts at the top of the uprights and be tied or strapped in place. But lab clamps, especially the swivel kind are sturdier and more elegant.
Email:Will Stackman, Master of Motions
posted by will 1:43 PM